Shadowrocket Setup Guide
Follow five steps, from importing existing details to verifying access. Confirm the result at each step before proceeding.
Import with Add Server or Subscribe
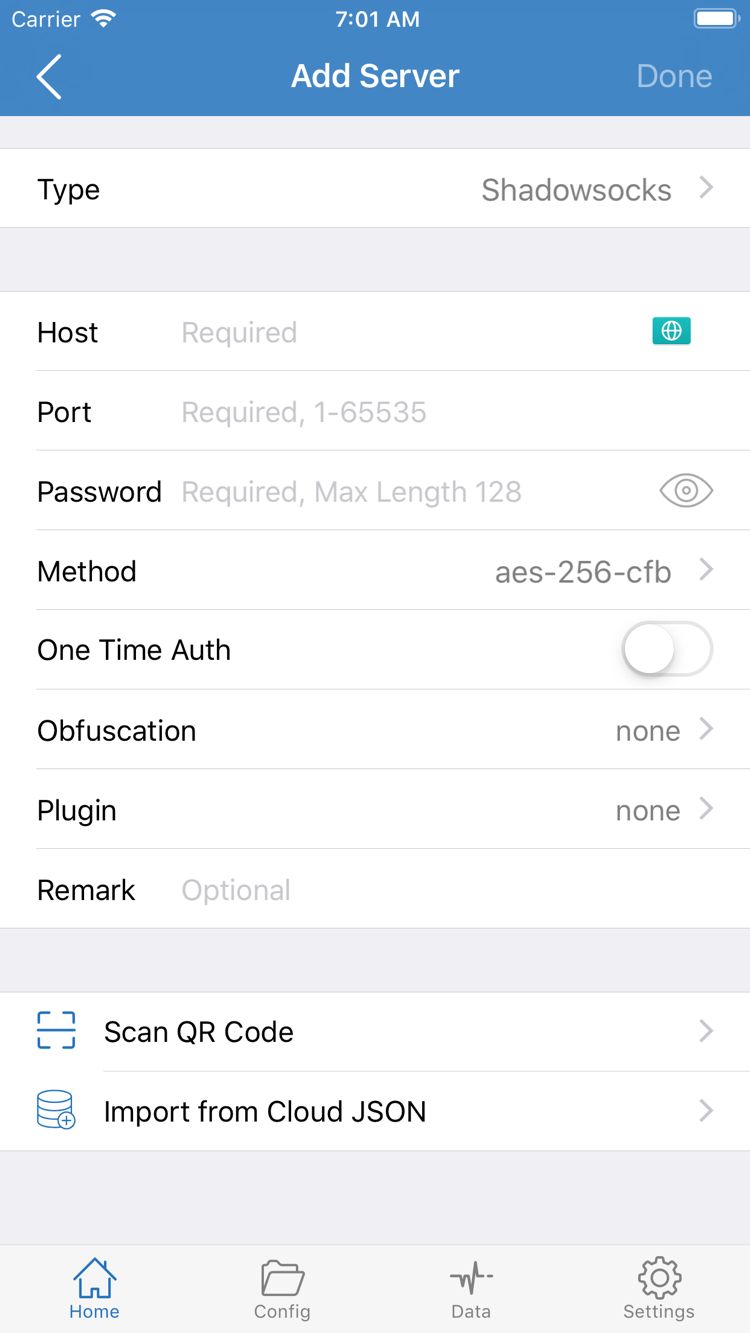
Open Shadowrocket and find Add Server in the SERVER section of Home. First identify what details you have: a subscription URL retrieves a group of servers, manual parameters add one server, and a QR code may contain either type of information. Choose one method; there is no need to import the same details more than once.
If you have a subscription URL, open Add Server, choose Subscribe under Type, paste the complete address into URL, and save. Include all query parameters at the end of the address, and do not enter a subscription URL as a single server's Host. Return to Home, expand the relevant subscription group, and check that selectable entries appear. If the group is still empty after saving, first check that the link is complete, then confirm that the subscription can update successfully.
If you have details for a single server, select the correct Type and fill in the fields required by that protocol. In the Shadowsocks example shown in the screenshot, check Host, Port, Password, and Method separately. Enter the address and port in their respective fields, make sure there are no extra spaces around the password, and use the Method specified in your details. Other protocols may require different fields; do not fill in fields that they do not require just because they appear in the screenshot.
If you have your own QR code, choose Scan QR Code from Add Server. Check the import result, then return to Home. QR codes and subscription URLs may contain credentials, so do not share screenshots publicly. Finally, select a server under SERVER and note its group and entry names to avoid confusing entries with the same name in the next step. For more field details, see the Add Server section of the server management manual.
Choose a Global Routing mode
Once an entry is selected, return to Home and open Global Routing. Selecting a server determines “which route to use”; the routing mode determines “whether this request uses a proxy.” These settings work independently: selecting an entry in the list does not mean every request will be forwarded through it.
- Config: Match requests against the active configuration file. Use this when you know which addresses should use a proxy and which should connect directly. If the destination does not match an earlier rule, check the final
FINALrule to see how unmatched requests are handled. - Proxy: Send requests handled by the client through the proxy route. For an initial diagnosis, use it briefly to test the selected server and distinguish an unreachable server from a configuration that sends a request elsewhere. Restore your usual mode after testing.
- Direct: Send requests without a proxy server to see how they behave on the current network. This does not turn off the Home connection switch and is not a substitute for disconnecting.
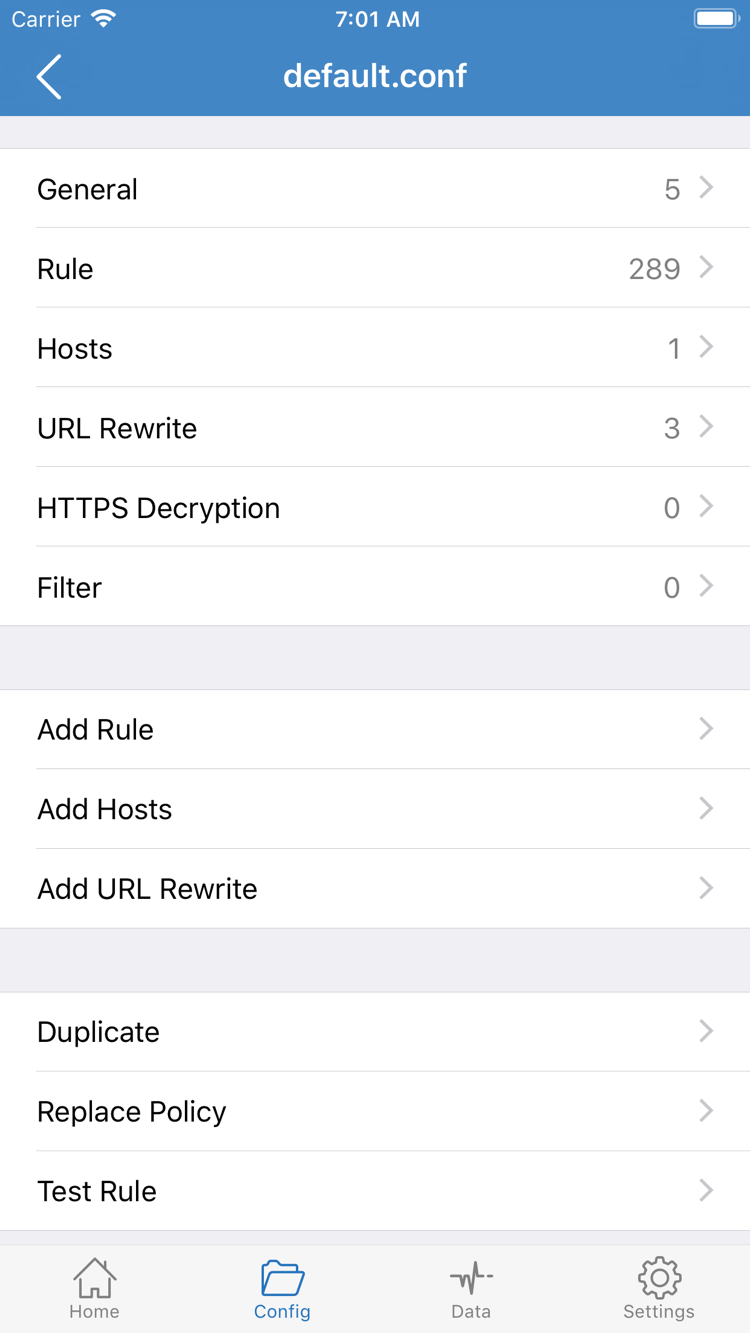
If you choose Config, open Config to check which file is active. To review the rules, open that file and view Rule. The screenshot shows the configuration file editor, not the Global Routing selection menu. Do not judge a rule's effect by the file name alone, and do not change URL Rewrite or HTTPS Decryption just to make the first connection.
For example, if a domain suffix points to PROXY in Rule, test with a known working page that uses that suffix. To first check whether the server can forward traffic, use Proxy; after it connects, return to Config and check the routing rules. Once you have chosen the mode for this test, return to Home and confirm that the displayed value has updated.
Turn on the Home connection switch
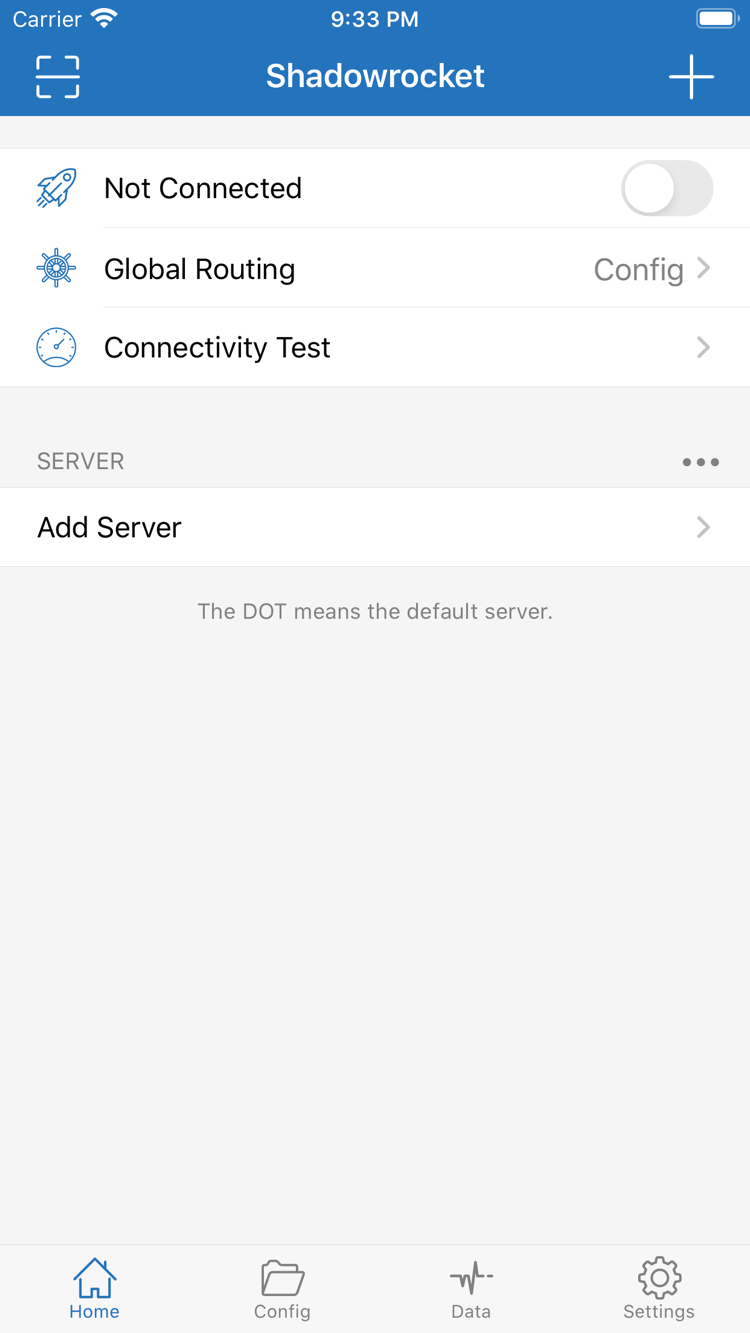
First check two things on Home: the selected entry under SERVER has not changed, and Global Routing shows the mode you just selected. Then turn on the switch next to Not Connected at the top. The system may ask to add a VPN configuration the first time you connect. Confirm that the prompt was triggered by Shadowrocket, then follow the system instructions. Complete any required device verification in the system interface.
Return to Home and wait for the switch to stay on. If it turns off again soon after you enable it, check for a permission prompt or error message; do not keep tapping it. If you previously dismissed the system prompt, check whether it appears again the next time you connect. If your device is managed by an organization that restricts VPN configurations, check its management requirements first rather than deleting existing configurations to troubleshoot.
If another VPN configuration is in use on the device, check whether it is occupying the current connection before testing. Only change connections that you can manage and are permitted to disconnect temporarily. If the device has just joined a Wi-Fi network that requires sign-in, turn off Shadowrocket, complete the network sign-in, then return to Home and connect. This helps avoid mistaking a network that is not ready for an unavailable server.
A switch that stays on means the client connection has started; it does not confirm that the target page will load in a browser or that a request is using a proxy. For example, Config may route the destination to DIRECT. At this step, check only the switch status. Keep the selected server and routing mode unchanged, then verify an actual request under the same conditions in the next step.
Verify with Connectivity Test and a real request
Keep the current network, server entry, and routing mode unchanged, then tap Connectivity Test on Home. The test tells you whether the entry responds to a probe under the current test method. A latency value means the probe received a response, but it does not mean every domain can be resolved or that requests from a target app use a proxy. If the test times out, first confirm which item was tested; do not use the result for a different entry instead.
Next, open a browser and visit a page you already know works. If you are testing Config, you can also test a page that should connect directly as a comparison. Use a reloaded page or make a new request rather than relying on a tab that is already open; a page that remains readable may simply be showing cached content. There is no need to visit unfamiliar sites or submit account details to test connectivity.
Return to Shadowrocket and look for a new record matching the time and destination domain of your visit. If the current screen shows a handling policy, check whether it is PROXY or DIRECT. A page loading successfully with the expected policy confirms that this routing setup worked as intended. If you only need to confirm that the device can access a page, a change in the traffic counter is not an additional pass condition.
To compare two modes, change only Global Routing and keep the same server and test page. If Proxy works but Config fails, check Rule first. If both modes fail, check the server parameters, device network, and target page status. If the issue can be reproduced, note which step fails and continue to the troubleshooting section below.
Troubleshoot with Settings, Diagnostics, and Data
Find the earliest step where something went wrong. If no entry appears, return to the import step and check that the address is complete, the correct Type is selected, and the subscription group loads. Changing the routing mode will not fix an import failure. If an entry exists but the switch will not stay on, check the system prompt and device permissions first; changing rules cannot resolve a connection that has not started.
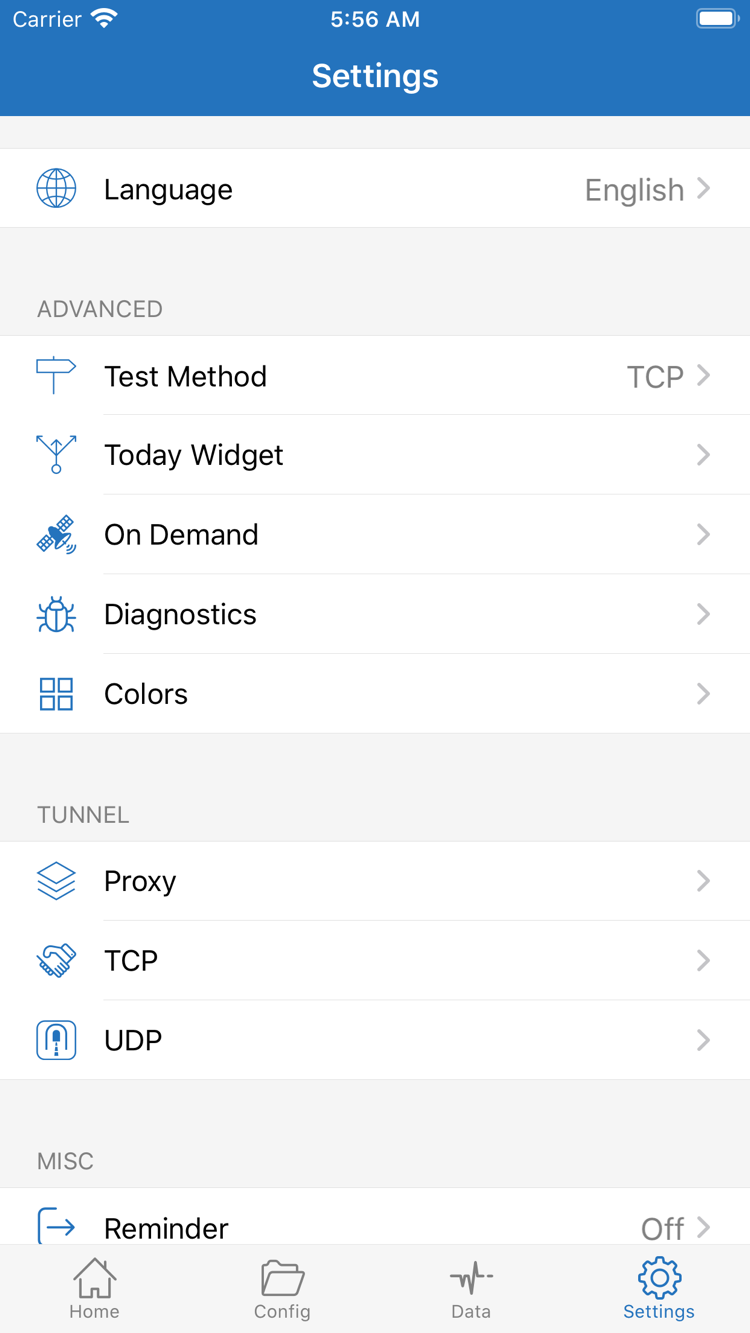
If the switch stays on but Connectivity Test returns an unexpected result, open Settings and check Test Method. Results from different test methods are not directly comparable, so use the same method when testing again. If only some pages fail to load, find Diagnostics in Settings and use it with the access records to distinguish a DNS resolution failure from a connection failure after resolution. For the former, check DNS first; for the latter, check Global Routing, the matched rule, and server parameters in that order. See How to troubleshoot DNS resolution failures for details.
Data is used to view traffic statistics. Compare the values before and after a test, but device background activity can also generate traffic. An increase in the counter alone does not prove that a page used PROXY. To identify a specific request, check its time, domain, and policy first. If the connection behaves unexpectedly after switching Wi-Fi networks or locking the screen, check whether On Demand in Settings affects automatic connection behavior on the device; it does not determine which rule matches an individual domain.
Change one setting per round, then test the same page again. If the change does not help, restore that setting before checking the next one to avoid overlapping changes. When documenting an issue, keep the connection status, routing mode, and any error text with sensitive details removed. Do not include subscription URLs, passwords, QR codes, or complete connection records. For managing multiple subscription groups, updating entries, or backing up server details, see the server management manual.